Our model’s skin is composed of separate meshes so to make it easier to demonstrate the deformation I will merge all the skin meshes into a single object.
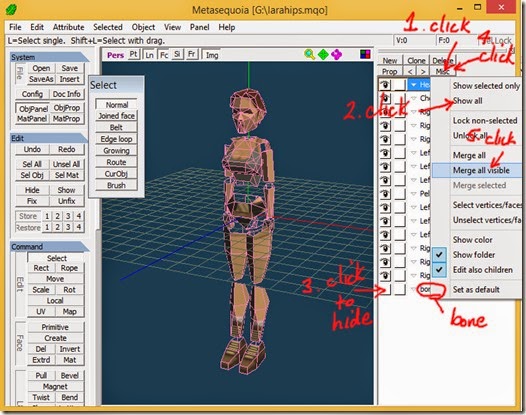
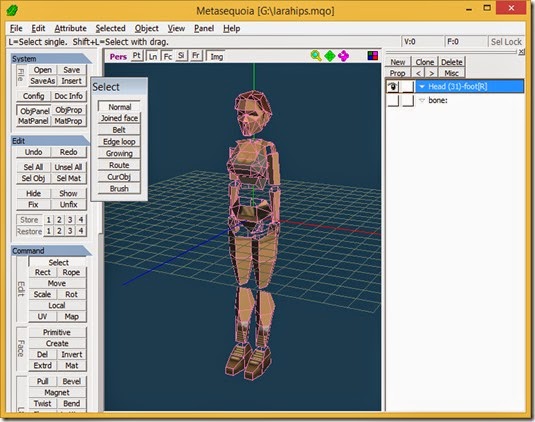
In Metasequoia, click “Misc” in the Object Panel and click “Show All” to make all objects visible and then hide the “bone” object.
Click “Misc” in the Object Panel and click “Merge all visible”.

Click OK on the dialog to merge the skin meshes into one mesh.

Rename the skin mesh object “bdef:skin” using the Object Property dialog.
Note that any name can be used for the object name after the colon.

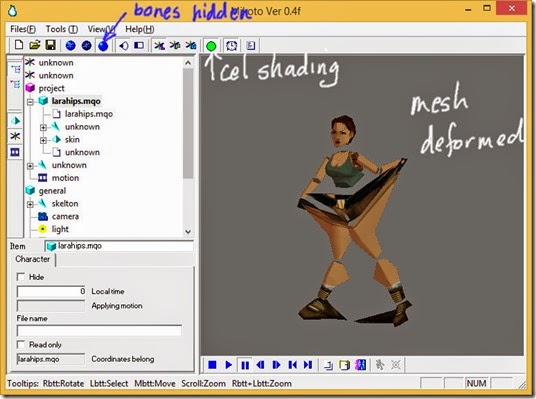
Save the *.mqo, load it into a new Mikoto project, move some bones and see that the skin mesh is deformed.

For bdef, Mikoto uses the length of the short side of the triangle used to create the bone in Metasequoia to determine which vertices to move with the bone.
The length of the short side is used to create a capsule shape around the bone as shown below. The capsule represents the zone of influence of the bone and any vertices inside the capsule will be bound to that bone.

The triangles for our model need to be resized if we are going to use this method.
The zone of influence for some bones such as the lower legs is too large and and includes vertices from other meshes that should be excluded.
The zone of influence for some bones such as the head and chest is too small and doesn’t envelop all the vertices so these vertices aren’t assigned to any bone and “stick” to their original position when the bone is moved causing very bad mesh deformation.
Fortunately Mikoto offers another way to assign mesh vertices to a bone.
Rather than relying on an invisible zone of influence to bind vertices, we create an object to envelop all the vertices we want to bind to a bone and then assign that object to the bone.
The objects we create to envelop the vertices are known as anchors.
To be recognised as an anchor in Mikoto the object name must begin with anchor.
Unlike the bone: object there can be many anchor objects. To name multiple anchor objects you can add any letters or numbers after the anchor prefix.
So for example one anchor may be named anchor_head and another anchor_body.
After the anchor name you add the pipe character (vertical line found on the back slash key on my keyboard ), |, and then add the name of the bdef mesh that the anchor applies to.
If your bdef object was named bdef:body then the anchor name would be anchor|body.
The simplest way to create an anchor is to create a box primitive and then move, scale and rotate it until it envelops the vertices you want to bind.
The anchor must at least contain one point of the bone triangle you want to link the anchor with. I haven’t tested this but I think umemori69 mentions this.
The anchors can be more complicated shapes as long as they are like an “airtight” container. You would use the knife tool and move vertices and polygons to shape the box into a more complicated shape.
Mikoto can handle very complicated anchors but Mikoto2x and Keynote are not as good at calculating complicated anchors so if using those programs keep the anchors as simple as possible.
When creating the anchor, use the same material as used for the bone that you want to link the anchor to. It is usual to make the material see through by reducing the Alpha channel in the Material Property dialog to 0.5 or less so that you can see your meshes through the anchor.
To display materials as see through make sure “Show precisely” is checked/ticked in the View menu.
Using the same material for a bone and its anchor to link them is not necessary in Mikoto but may be necessary for Keynote. I have to test whether using the same material is a surer way to link an anchor with a bone.
Another method to link the anchor if you have separate anchors for the mesh is to append the bone name at the end, separated with a hyphen (dash), –. For example, anchor_head|headmeshname-headbonename.
Download Metasequoia models prepared for Mikoto to study the shapes allowed for anchors and also how they are named and linked to the bones.
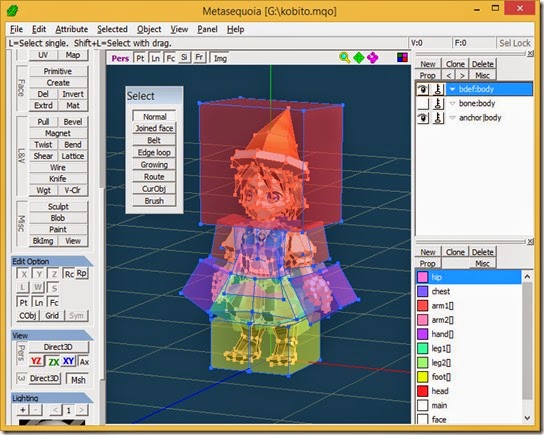
The anchors for the kobito.mqo sample included with Mikoto2x are shown in the screenshot below.
The anchors in this case are a single object, the same material is used for a bone and its anchor and each anchor has a simple shape.

In Mikoto a vertex can only be assigned to a maximum of two bones. This is done by including the vertex inside two anchors.
The vertex will move when either bone is moved. The bone it is closest to will have the greatest influence.
prev | next
No comments:
Post a Comment