Metasequoia uses a new default file format from version 4.7 which has extension *.mqoz.
This a just a *.zip file that contains an *.mqo file and a thumbnail.jpg file and maybe an *.mqx file.
Below are examples in Delphi 10.2 and Python 2.7 that show how to read the *.mqo inside the *.zip.
Showing posts with label Metasequoia. Show all posts
Showing posts with label Metasequoia. Show all posts
Friday, 17 May 2019

Monday, 23 March 2015
Classic style theme for Metasequoia 4
A Japanese user has uploaded themes for Metasequoia 4 that recreate the style of Metasequoia 3 (top image) and the Japanese paint program SAI Paint (bottom image).
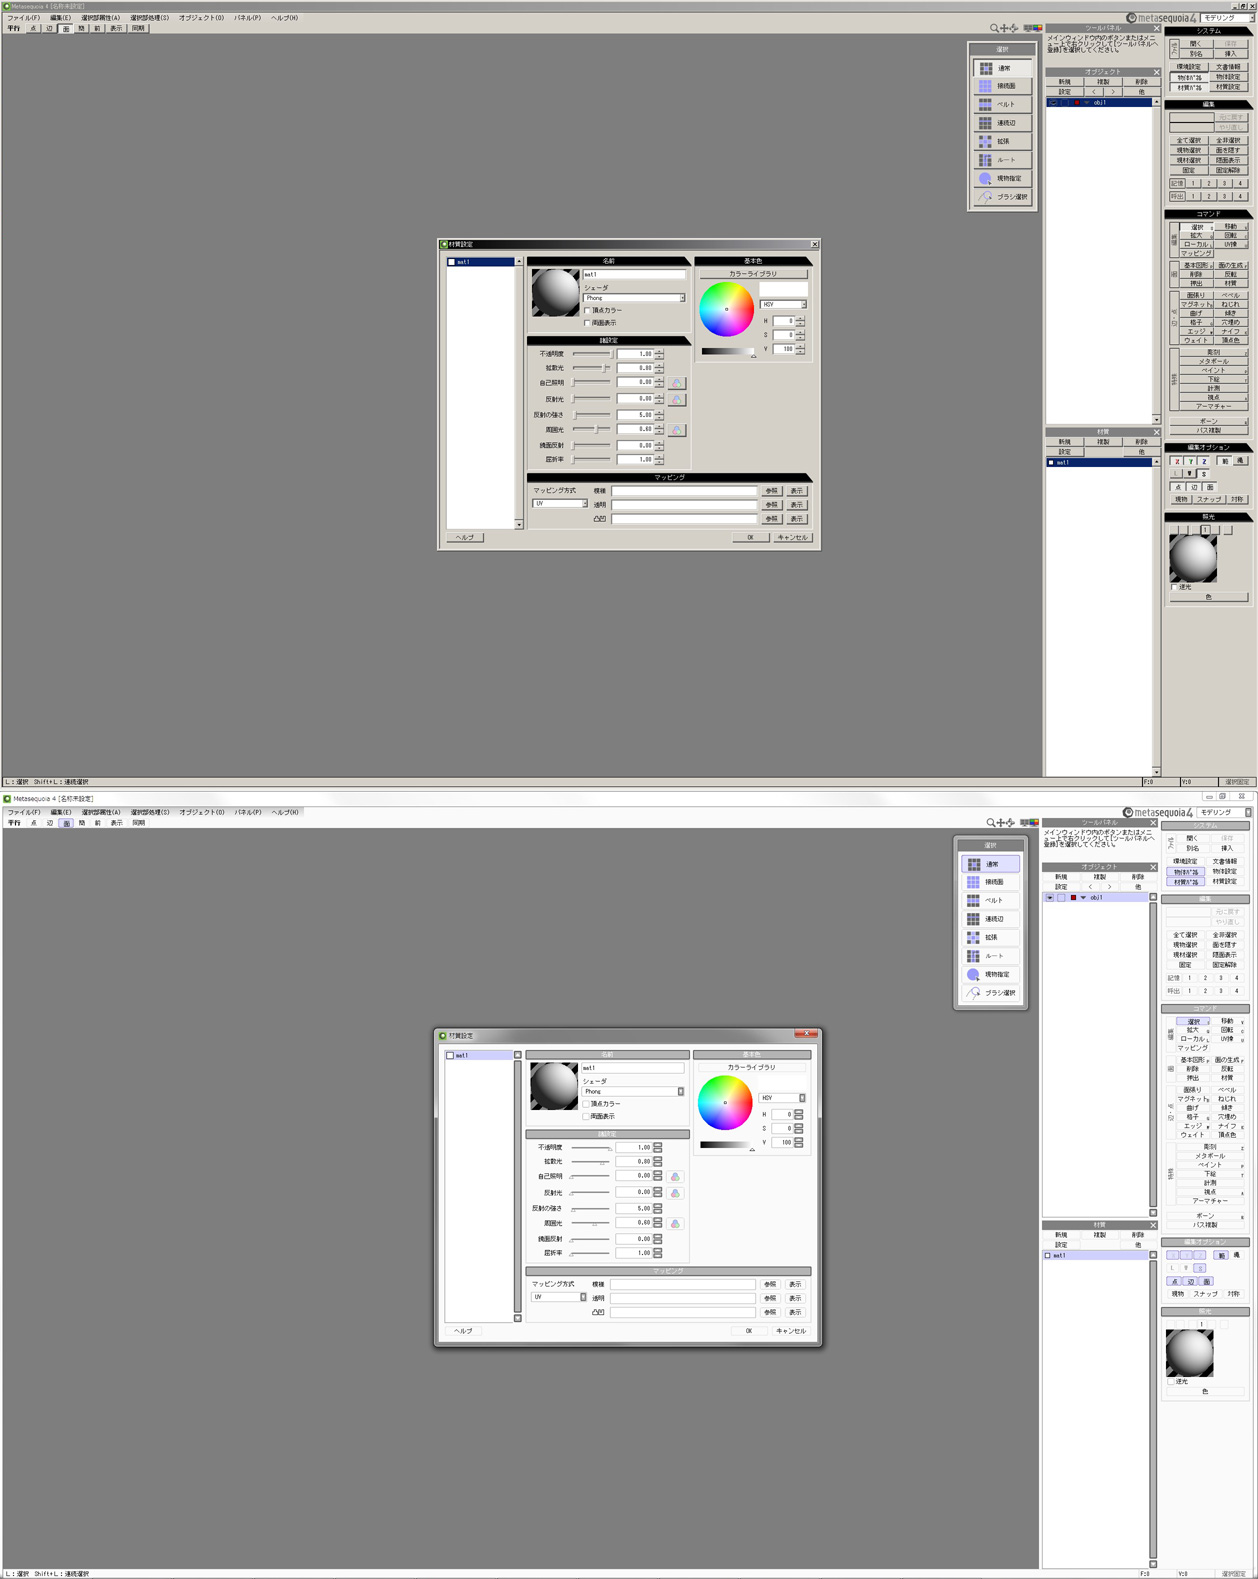
Classic Theme
Links and screenshot obtained from Metasequoia BBS post [5447].
Classic Theme
- https://bowlroll.net/file/66483 (Japanese website)
- https://bowlroll.net/file/66468 (Japanese website)
Links and screenshot obtained from Metasequoia BBS post [5447].
Tuesday, 8 July 2014
Keynote *.mqx file format
The Keynote plugin for Metasequoia stores its animation data in an XML text file with the file extension *.mqx.
I created the following simple animation using the Keynote plugin to study the keyframe data stored in the *.mqx file.
The animation starts and ends with both bones pointing in the +Y axis direction.

I created the following simple animation using the Keynote plugin to study the keyframe data stored in the *.mqx file.
The animation starts and ends with both bones pointing in the +Y axis direction.

Wednesday, 2 July 2014
Animating with Mikoto – part 9
To use the spherical deformation method in Mikoto the name of the object containing the mesh to be deformed must begin with sdef:. Do not forget the colon :.
Unlike the bone deformation method, the spherical deformation method only works when anchor objects have been created to bind the vertices to the bones.
Change our skin mesh object’s name to “sdef:skin” and save the *.mqo.

Unlike the bone deformation method, the spherical deformation method only works when anchor objects have been created to bind the vertices to the bones.
Change our skin mesh object’s name to “sdef:skin” and save the *.mqo.

Friday, 20 June 2014
Metasequoia 4.2.2 User Interface Customisation
By default Metasequoia 4 ships with four predefined edit modes.
A “Customize” option has been added to the Edit Mode dropdown menu in Metasequoia 4.2.2.

- Beginner
- Modeling (String)
- Modeling (Icon)
- Mapping
A “Customize” option has been added to the Edit Mode dropdown menu in Metasequoia 4.2.2.

Tuesday, 17 June 2014
Monday, 16 June 2014
Metasequoia Script – Mikoto bdef bone influence
See this post [link] for the basics of scripting in Metasequoia.
In this post [link] I talk about how Mikoto assigns vertices to a bone using the geometry of the triangle created in Metasequoia for bdef meshes without using anchors.
To help visualise which vertices will be bound to a bone I wrote a script that shows the zone of influence of each bone.
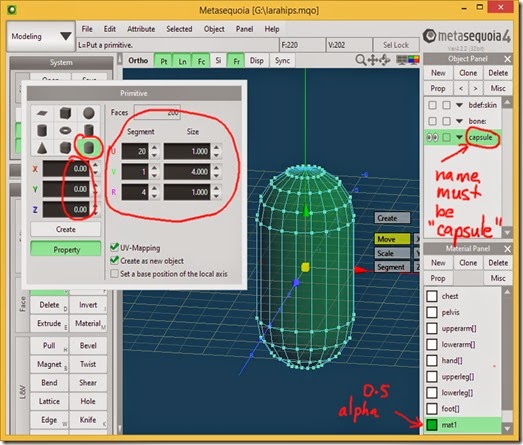
The Metasequoia Python API doesn’t have routines to create Primitive objects so rather than create an object in code this script requires a Primitive to be created in Metasequoia which it can copy.
The Primitive object must be named capsule and have its properties set as shown in the screenshot below.
In this post [link] I talk about how Mikoto assigns vertices to a bone using the geometry of the triangle created in Metasequoia for bdef meshes without using anchors.
To help visualise which vertices will be bound to a bone I wrote a script that shows the zone of influence of each bone.
The Metasequoia Python API doesn’t have routines to create Primitive objects so rather than create an object in code this script requires a Primitive to be created in Metasequoia which it can copy.
The Primitive object must be named capsule and have its properties set as shown in the screenshot below.

Sunday, 8 June 2014
Metasequoia 4.2 *.mqo file includes a thumbnail
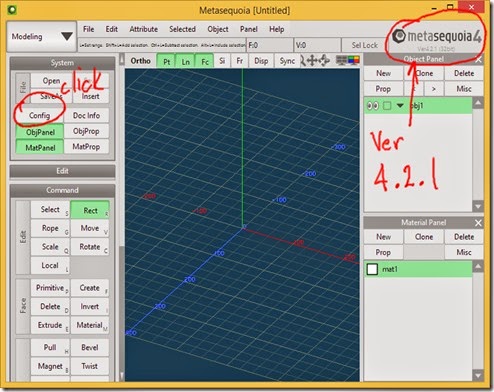
Be aware that Version 4.2.1 of Metasequoia embeds a thumbnail image in an *.mqo file by default.
This means a large increase in the size of the *.mqo file.
It may also make the *.mqo file incompatible with some programs.
Since version 4.1 was uninstalled when I installed version 4.2.1 I cannot check whether version 4.1 also saved a thumbnail in the *.mqo.
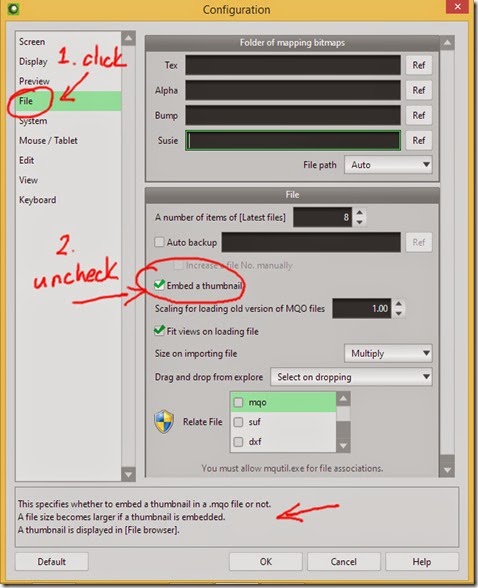
You can disable this feature by clicking File>Configuration>File and unchecking “Embed a thumbnail”.
This means a large increase in the size of the *.mqo file.
It may also make the *.mqo file incompatible with some programs.
Since version 4.1 was uninstalled when I installed version 4.2.1 I cannot check whether version 4.1 also saved a thumbnail in the *.mqo.
You can disable this feature by clicking File>Configuration>File and unchecking “Embed a thumbnail”.


Animating with Mikoto – part 8
To use the bone deformation method in Mikoto the name of the object containing the mesh to be deformed must begin with bdef:. Do not forget the colon :.
Our model’s skin is composed of separate meshes so to make it easier to demonstrate the deformation I will merge all the skin meshes into a single object.
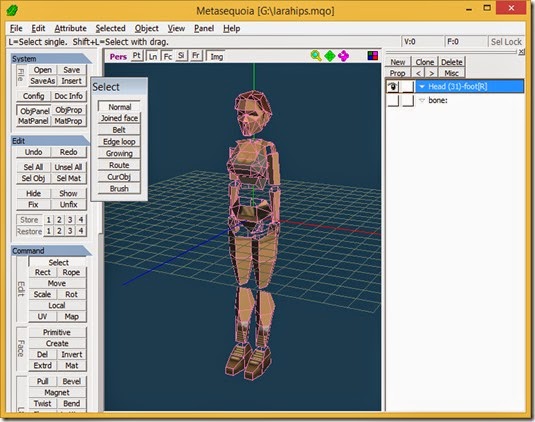
In Metasequoia, click “Misc” in the Object Panel and click “Show All” to make all objects visible and then hide the “bone” object.
Click “Misc” in the Object Panel and click “Merge all visible”.
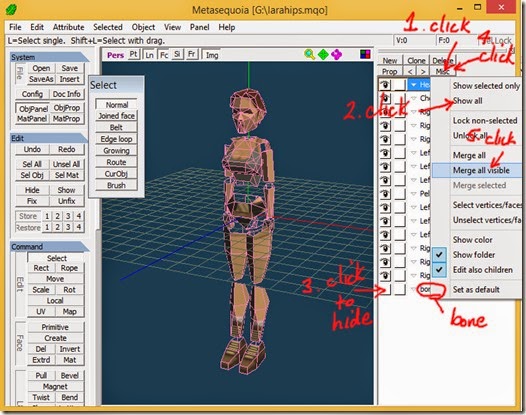
Click OK on the dialog to merge the skin meshes into one mesh.
Our model’s skin is composed of separate meshes so to make it easier to demonstrate the deformation I will merge all the skin meshes into a single object.
In Metasequoia, click “Misc” in the Object Panel and click “Show All” to make all objects visible and then hide the “bone” object.
Click “Misc” in the Object Panel and click “Merge all visible”.

Click OK on the dialog to merge the skin meshes into one mesh.

Saturday, 7 June 2014
Metasequoia Script–Lots of cubes
Animating with Mikoto – part 7
We used the closest bone method to assign our character’s meshes to the bones in the skeleton.
When a model is composed of separate mesh objects as ours is you can specify which bone a mesh is bound to by adding the bone name to the mesh object’s name separated with a hyphen (dash), “-”.
As an example I have bound the “Head (31)” object to the “foot[R]” bone by changing the object name to “Head (31)-foot[R]”.

In Mikoto the head no longer moves when the “head” bone is moved but only when the “foot[R]” bone is moved.

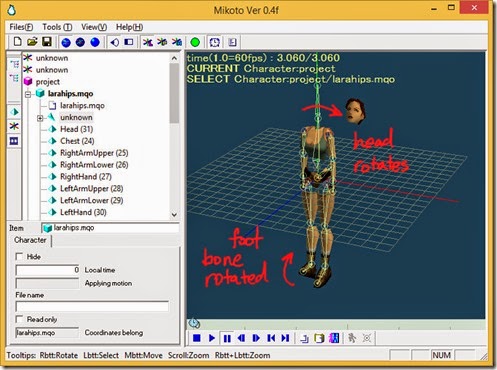
Of course you would not bind the head mesh to the foot. I only did this to illustrate how this new method of binding meshes to bones overrides the closest bone.
The technique we have been using so far has not changed the shape of any of the meshes.
This method is all you need for some objects but for most human and animal characters you want to make the meshes bend smoothly at the joints such as elbows and knees etc.
To do this in Mikoto you have two choices, bone deformation (bdef) or spherical deformation (sdef).
prev | next
When a model is composed of separate mesh objects as ours is you can specify which bone a mesh is bound to by adding the bone name to the mesh object’s name separated with a hyphen (dash), “-”.
As an example I have bound the “Head (31)” object to the “foot[R]” bone by changing the object name to “Head (31)-foot[R]”.

In Mikoto the head no longer moves when the “head” bone is moved but only when the “foot[R]” bone is moved.


Of course you would not bind the head mesh to the foot. I only did this to illustrate how this new method of binding meshes to bones overrides the closest bone.
The technique we have been using so far has not changed the shape of any of the meshes.
This method is all you need for some objects but for most human and animal characters you want to make the meshes bend smoothly at the joints such as elbows and knees etc.
To do this in Mikoto you have two choices, bone deformation (bdef) or spherical deformation (sdef).
prev | next
Friday, 6 June 2014
Metasequoia Script–Sierpinski Triangle Pyramid
See this post [link] for the basics of using Metasequoia’s Script Editor.
I found an interesting script at this Japanese blog [link].
Make sure you have an empty Scene in Metasequoia by clicking File>New then open the Script Editor and paste the code into the upper input pane of the editor.

Press F5 or Script>Run to execute the script and create the object.

I found an interesting script at this Japanese blog [link].
# fractal generate

doc = MQSystem.getDocument()

num = doc.numObject
obj = doc.object[0]

# field

x = 100
y = 100
z = 100
rn = 4 # recursive number

# Primitive

p01 = MQSystem.newPoint(x/2,y,z/2)
p02 = MQSystem.newPoint(0,0,0)
p03 = MQSystem.newPoint(x,0,0)
p04 = MQSystem.newPoint(x,0,z)
p05 = MQSystem.newPoint(0,0,z)

# function fractal()

def fractal(number,p1,p2,p3,p4):

  if number == 1:

    #left

    v = []
    v.append( obj.addVertex(p1) )
    v.append( obj.addVertex(p2) )
    v.append( obj.addVertex(p3) )

    obj.addFace(v)

    #right

    v = []
    v.append( obj.addVertex(p1) )
    v.append( obj.addVertex(p3) )
    v.append( obj.addVertex(p4) )

    obj.addFace(v)

    # bottom

    v = []
    v.append( obj.addVertex(p4) )
    v.append( obj.addVertex(p3) )
    v.append( obj.addVertex(p2) )

    obj.addFace(v)

  else:
    p5 = MQSystem.newPoint((p1.x + p2.x)/2, (p1.y + p2.y)/2, (p1.z + p2.z)/2)
    p6 = MQSystem.newPoint((p2.x + p3.x)/2, (p2.y + p3.y)/2, (p2.z + p3.z)/2)
    p7 = MQSystem.newPoint((p3.x + p1.x)/2, (p3.y + p1.y)/2, (p3.z + p1.z)/2)
    p8 = MQSystem.newPoint((p3.x + p4.x)/2, (p3.y + p4.y)/2, (p3.z + p4.z)/2)
    p9 = MQSystem.newPoint((p4.x + p1.x)/2, (p4.y + p1.y)/2, (p4.z + p1.z)/2)
    p10 = MQSystem.newPoint((p4.x + p2.x)/2, (p4.y + p2.y)/2, (p4.z + p2.z)/2)

    fractal(number-1,p1,p5,p7,p9)
    fractal(number-1,p5,p2,p6,p10)
    fractal(number-1,p7,p6,p3,p8)
    fractal(number-1,p9,p10,p8,p4)
    fractal(number-1,p7,p8,p10,p6)

# endfunction fractal()

#main()

fractal(rn,p01,p02,p03,p04)
fractal(rn,p01,p04,p05,p02)
Make sure you have an empty Scene in Metasequoia by clicking File>New then open the Script Editor and paste the code into the upper input pane of the editor.

Press F5 or Script>Run to execute the script and create the object.

Tuesday, 27 May 2014
Metasequoia Script – integer vertex coordinates
The registered version of Metasequoia allows scripting in the Python language.
This article will demonstrate a script to move all vertices (also known as points) in an object to integer coordinates.
An integer is a whole number like 1, 2, 3, 40, 75 etc.
A trial license for Metasequoia 4 is easy to obtain and unlocks all features for a limited time including the Script Editor. [link]
This article will demonstrate a script to move all vertices (also known as points) in an object to integer coordinates.
An integer is a whole number like 1, 2, 3, 40, 75 etc.
A trial license for Metasequoia 4 is easy to obtain and unlocks all features for a limited time including the Script Editor. [link]
Friday, 16 May 2014
Animating with Mikoto – part 6
We have rigged our model ready for animating in Mikoto.
I’m not very good at animating so how did I create the animation seen in part 1?
Mikoto can open *.bvh files which store motion capture data.
UPDATE: Mikoto cannot open *.bvh files which have values written in scientific format e.g. -8.759e-005.
In Mikoto’s Sample folder you will find dance01.bvh which is the file I used to animate Lara.
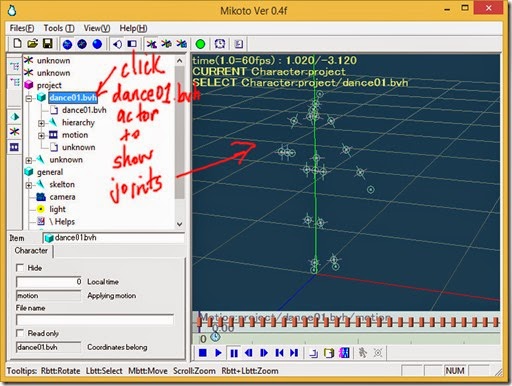
Click New in Mikoto to start a new project and then open dance01.bvh.
A new actor object named dance01.bvh is added to the project.
Each actor object is indicated in the tree with a cyan coloured cube icon.
Select dance01.bvh by clicking on its name.
The hierarchy for a *.bvh file is displayed as circles containing small XYZ axes instead of bones.
I’m not very good at animating so how did I create the animation seen in part 1?
Mikoto can open *.bvh files which store motion capture data.
UPDATE: Mikoto cannot open *.bvh files which have values written in scientific format e.g. -8.759e-005.
In Mikoto’s Sample folder you will find dance01.bvh which is the file I used to animate Lara.
Click New in Mikoto to start a new project and then open dance01.bvh.
A new actor object named dance01.bvh is added to the project.
Each actor object is indicated in the tree with a cyan coloured cube icon.

Select dance01.bvh by clicking on its name.
The hierarchy for a *.bvh file is displayed as circles containing small XYZ axes instead of bones.

Wednesday, 14 May 2014
Animating with Mikoto – part 5
For my character I will use the Lara Croft model from a Tomb Raider Level Editor (TRLE) *.wad file.
The post http://sappersblog.blogspot.com/ tells where to obtain TRLE or *.wad files if you don’t have them.
Open the *.wad file in version 1.4 of my EditWad program.
Information about EditWad can be found at http://www.tombraiderforums.com/.
EditWad can also be downloaded from http://www.trsearch.org/Tools/25/.
EditWad has a console window and a GUI window. The console window only displays information.
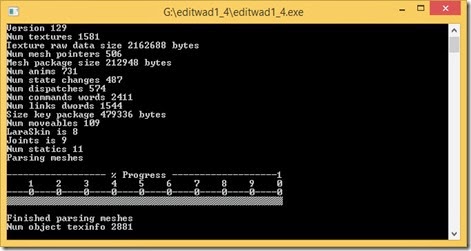
All interaction is with the GUI window.
Click on the slider and drag it to the far right until the number on the top right blue button is “7”.
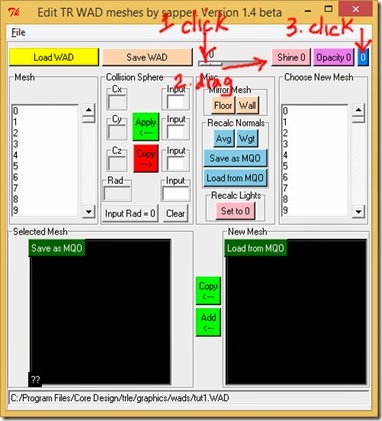
Click the blue button with the “7” on it to bring up the save dialog and save the *.mqo file.
Close EditWad as it is no longer needed.
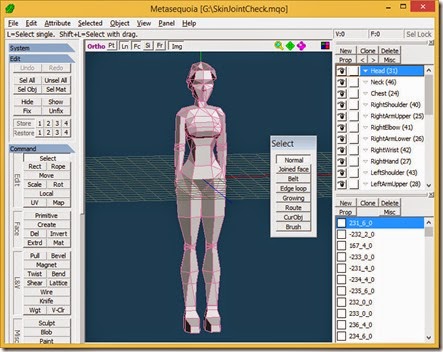
Open the file you saved in Metasequoia.
Note that meshes are exported from EditWad at 1:1 scale and meshes in TRLE *.wad files are big.
You may need to change the Distance setting in Field of view by clicking View>Set View.
The post http://sappersblog.blogspot.com/ tells where to obtain TRLE or *.wad files if you don’t have them.
Open the *.wad file in version 1.4 of my EditWad program.
Information about EditWad can be found at http://www.tombraiderforums.com/.
EditWad can also be downloaded from http://www.trsearch.org/Tools/25/.
EditWad has a console window and a GUI window. The console window only displays information.

All interaction is with the GUI window.
Click on the slider and drag it to the far right until the number on the top right blue button is “7”.

Click the blue button with the “7” on it to bring up the save dialog and save the *.mqo file.
Close EditWad as it is no longer needed.
Open the file you saved in Metasequoia.
Note that meshes are exported from EditWad at 1:1 scale and meshes in TRLE *.wad files are big.
You may need to change the Distance setting in Field of view by clicking View>Set View.

Tuesday, 13 May 2014
Animating with Mikoto – part 4
You can also connect triangles in Metasequoia root to root.
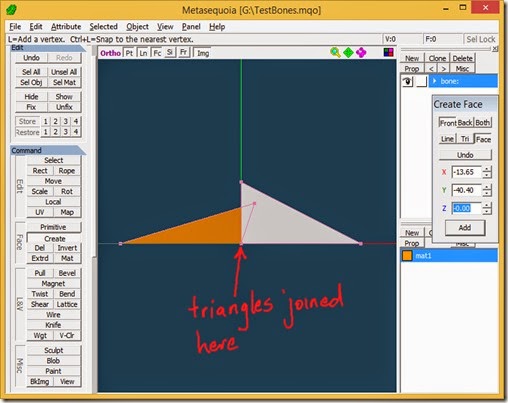
You will see this type of connection in many humanoid character models so that the lower half of the body can be rotated independently of the top half and vice versa.
The root-root connection is the end of the IK chain for both halves of the body and can be translated.
An example can be found in lowbody_sdef.mqo located in the Sample folder included with Mikoto.
This type of connection is only allowed once in the skeleton.

You will see this type of connection in many humanoid character models so that the lower half of the body can be rotated independently of the top half and vice versa.
The root-root connection is the end of the IK chain for both halves of the body and can be translated.
An example can be found in lowbody_sdef.mqo located in the Sample folder included with Mikoto.
This type of connection is only allowed once in the skeleton.
Animating with Mikoto – part 3
I will be using Metasequoia 3.1.6.
I am using this version because I prefer the user interface to that of the newer version.
If you are using the newer version you may need to save in Metasequoia Format version 1.0 for compatibility with Mikoto.
<update>
Now I have used Metasequoia 4 I see that there is no option to save as Format 1.0. What you can do is make sure you triangulate any N-Gons which are polygons made from 5 or more points and save the *.mqo.
Then either open the *.mqo in Metasequoia 3 and save or open the Metasequoia 4 *.mqo in a text editor and change the version in the header from 1.1 to 1.0.
If using Metasequoia 4.2 or newer make sure not to save with an embedded thumbnail [link].
An easier way is just to save as version 2.2 *.mqo in Metasequoia 4 since Mikoto can open those files.
</update>
To animate with Mikoto you create a model in Metasequoia in one or more object layers and then create a skeleton in an object layer of its own.
The skeleton (also known as an armature) is made up of bones with each bone sized, positioned and angled to match parts of the model. Each bone can be rotated and some translated to create the animation.
Each part of the model is then assigned to a bone or bones so that when a bone is manipulated, the corresponding part of the model is manipulated as if it was connected to the bone.
Mikoto allows different ways to assign parts of a model to bones.
I am using this version because I prefer the user interface to that of the newer version.
If you are using the newer version you may need to save in Metasequoia Format version 1.0 for compatibility with Mikoto.
<update>
Now I have used Metasequoia 4 I see that there is no option to save as Format 1.0. What you can do is make sure you triangulate any N-Gons which are polygons made from 5 or more points and save the *.mqo.
Then either open the *.mqo in Metasequoia 3 and save or open the Metasequoia 4 *.mqo in a text editor and change the version in the header from 1.1 to 1.0.
If using Metasequoia 4.2 or newer make sure not to save with an embedded thumbnail [link].
An easier way is just to save as version 2.2 *.mqo in Metasequoia 4 since Mikoto can open those files.
</update>
To animate with Mikoto you create a model in Metasequoia in one or more object layers and then create a skeleton in an object layer of its own.
The skeleton (also known as an armature) is made up of bones with each bone sized, positioned and angled to match parts of the model. Each bone can be rotated and some translated to create the animation.
Each part of the model is then assigned to a bone or bones so that when a bone is manipulated, the corresponding part of the model is manipulated as if it was connected to the bone.
Mikoto allows different ways to assign parts of a model to bones.
- Use object names
- Use boxes (known as anchors) around parts of the model
- Use materials
- Use the closest bone
- Use the size of the bone
Saturday, 10 May 2014
Animating with Mikoto – part 2
There are four versions of Mikoto available on the internet.
From oldest to youngest they are 0.3g, 0.4c2, 0.4d and 0.4f.
Version 0.3g is the only one that can do Morphing (change mesh size and shape) but sometimes it is not possible to run this version on a modern PC.
I will use the English version of Mikoto 0.4f available for download in part 1.
I can't find any English tutorials for Mikoto so online translation is often necessary to learn how to use the program.
I found all the following webpages by searching for Mikoto+Metasequoia or Mikoto+Metaseko or Mikoto 0.4f in an internet search engine.
The following web page is the official manual written by the author for version 0.3g but is still probably the best introduction to Mikoto.
A lot of Mikoto tutorial sites recommend a pictorial tutorial by a user named UMEMORI*69 but the website has disappeared.
Fortunately most of the tutorial has been preserved at the webarchive. Translation though is not easy since the Japanese instructions are part of the images and not text but the diagrams can be easy to follow once you have aworking knowledge of Mikoto.
More Japanese sites with Mikoto tips are:
The following French sites also have guides for Mikoto.
Another good way to learn is to study the *.mqo and *.mks files some users have released to the public.
Downloads are available at the following sites.
Following hyperlinks on the Japanese sites can also lead to more downloads and tips.
prev | next
From oldest to youngest they are 0.3g, 0.4c2, 0.4d and 0.4f.
- Versions 0.3g, 0.4d and 0.4f are available from http://ryot.jimdo.com/ (Click on "Downloads")
- Version 0.4c2 and 0.4f from http://mattaku.sa-ra-sa.com/ (Click on the link/square next to "Mikoto" at the top of the page and click on the images)
Version 0.3g is the only one that can do Morphing (change mesh size and shape) but sometimes it is not possible to run this version on a modern PC.
I will use the English version of Mikoto 0.4f available for download in part 1.
I can't find any English tutorials for Mikoto so online translation is often necessary to learn how to use the program.
I found all the following webpages by searching for Mikoto+Metasequoia or Mikoto+Metaseko or Mikoto 0.4f in an internet search engine.
The following web page is the official manual written by the author for version 0.3g but is still probably the best introduction to Mikoto.
A lot of Mikoto tutorial sites recommend a pictorial tutorial by a user named UMEMORI*69 but the website has disappeared.
Fortunately most of the tutorial has been preserved at the webarchive. Translation though is not easy since the Japanese instructions are part of the images and not text but the diagrams can be easy to follow once you have aworking knowledge of Mikoto.
- http://web.archive.org/web/20070916050438/http://umemori69.hp.infoseek.co.jp/umemori69_001.htm (Japanese) (Click on "Mikoto Tips")
More Japanese sites with Mikoto tips are:
- http://witchcraft-jp.sakura.ne.jp/mm/mm.html
- http://mattaku.sa-ra-sa.com/ (Click on the links/squares next to "Mikoto TIPS" at the top of the page)
- http://mclab.uunyan.com/e3d/rb2007.htm
The following French sites also have guides for Mikoto.
- http://www.maquettes-papier.net/forumenpapier/topic2948.html
- http://lesartstronautes.bbconcept.net/t27-intro-et-liens-logiciels (A step by step guide with links to the lessons at the bottom of the page)
- http://graphimaker.graphforum.com/avis-de-consommateur-f50/metasequoia-mikoto-pepakura-t925.htm
Another good way to learn is to study the *.mqo and *.mks files some users have released to the public.
Downloads are available at the following sites.
- CypherS TufT (Japanese)
- CypherS TufT Garbage (Japanese) Warning: some cartoon nudity
- http://witchcraft-jp.sakura.ne.jp/mm/mm.html (Japanese) (Downloads included in tips)
- http://mattaku.sa-ra-sa.com/ (Japanese) (Click on the link/square next to "Mikoto" at the top of the page and click the images)
Following hyperlinks on the Japanese sites can also lead to more downloads and tips.
prev | next
Tuesday, 6 May 2014
Animating with Mikoto – part 1
Mikoto is an abandoned Japanese program for animating models created in Metasequoia, a Japanese 3D modelling program.
Metasequoia files have the extension .mqo.
Some other programs that can be used for animating *.mqo models are:
I don’t have a registered version of Metasequoia so cannot use Keynote.
So that leaves Mikoto.
I obtained an English translation of Mikoto from this thread but the hyperlink is now dead so you can download the translated version here, MIKOTO_EN.rar.
UPDATE: The models from the thread at sai.detstwo.com can be downloaded from these links.
The Japanese version can be downloaded here.
A French translation can be found in this forum [link].
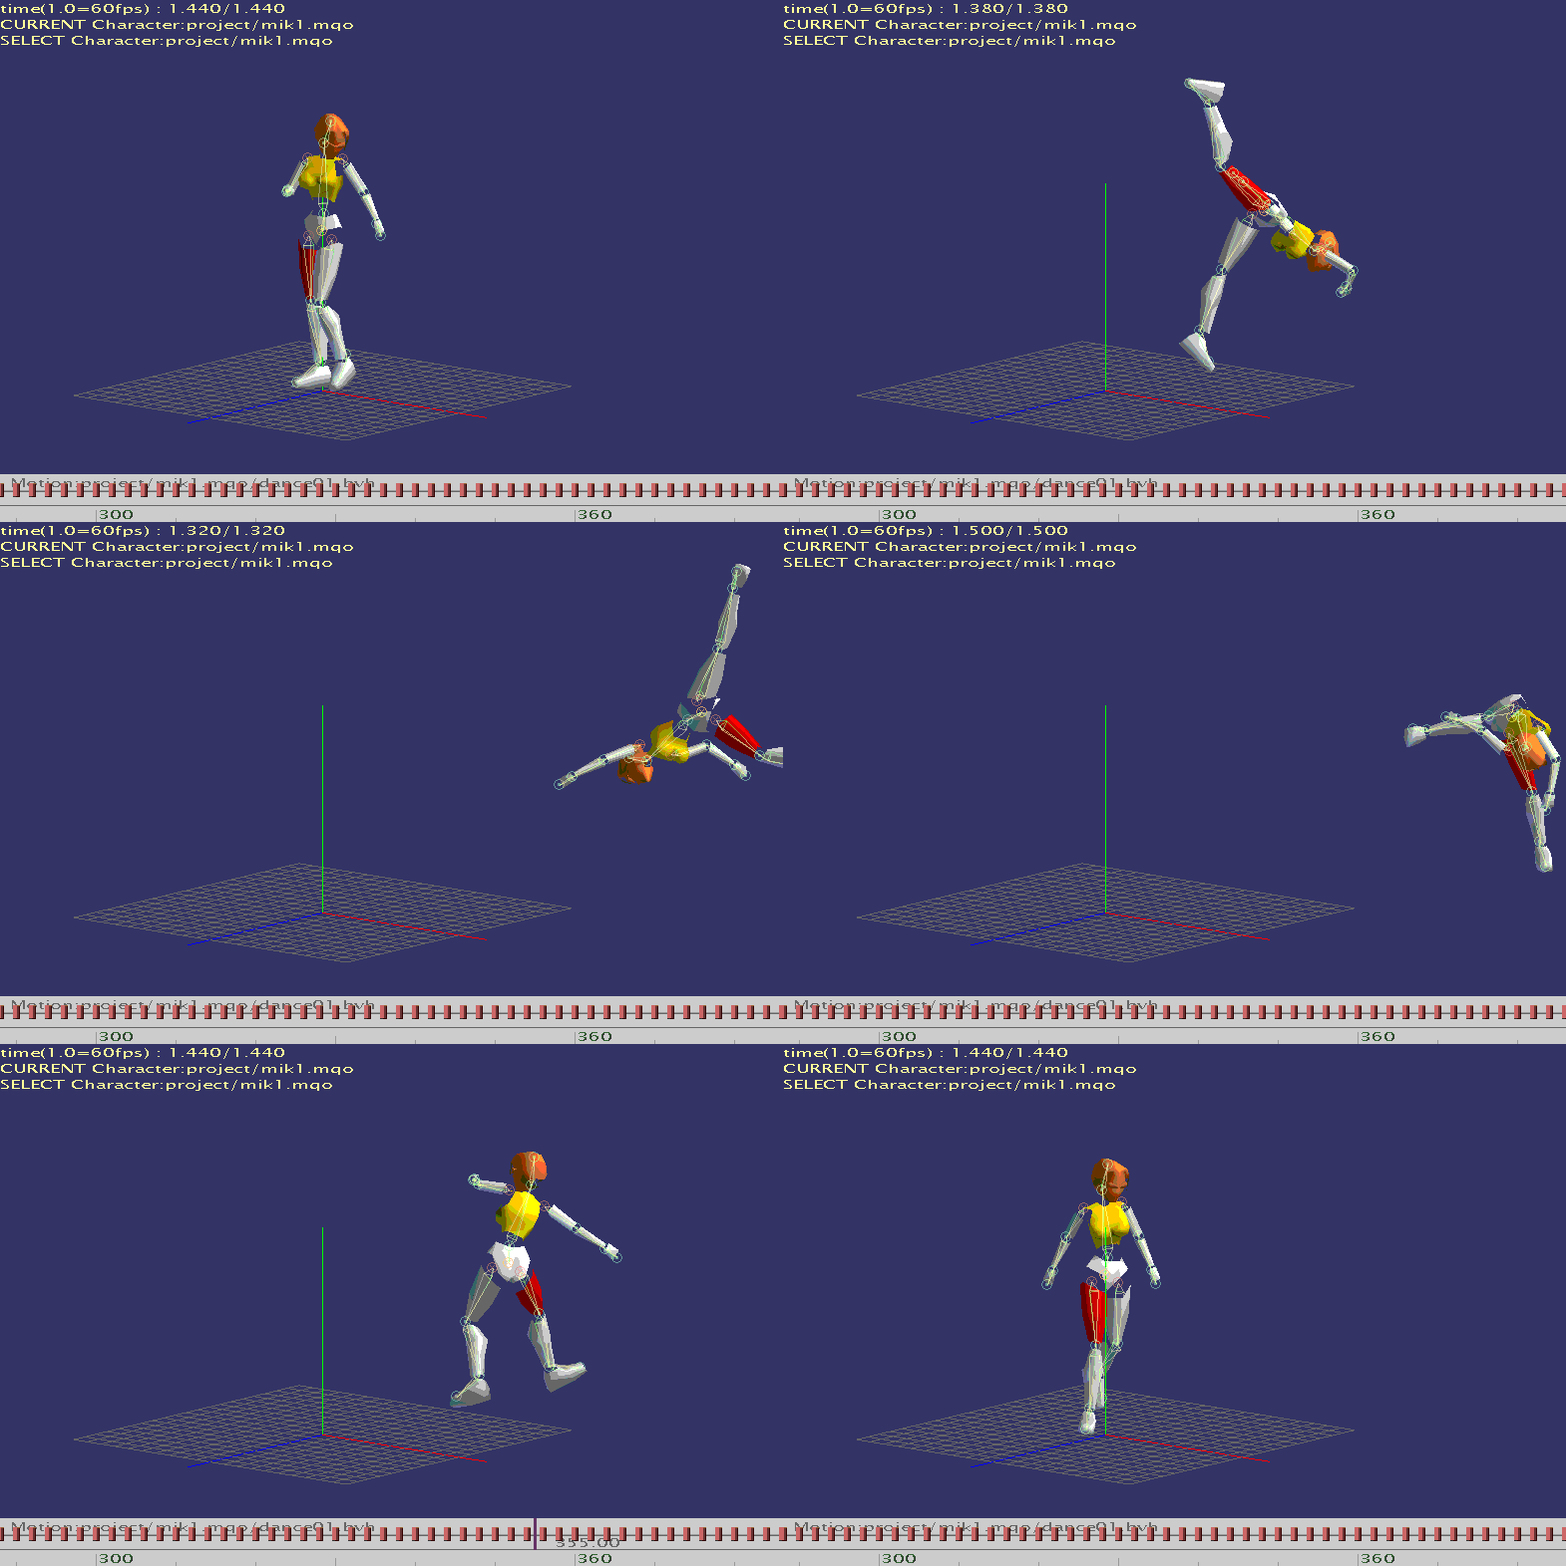
In this series of articles I will explain how I created the following animation.
next
Metasequoia files have the extension .mqo.
Some other programs that can be used for animating *.mqo models are:
- Keynote which is a plugin for use with a registered version of Metasequoia.
I don’t have a registered version of Metasequoia so cannot use Keynote.
- ToyStudio which is a Japanese animating program.
So that leaves Mikoto.
I obtained an English translation of Mikoto from this thread but the hyperlink is now dead so you can download the translated version here, MIKOTO_EN.rar.
UPDATE: The models from the thread at sai.detstwo.com can be downloaded from these links.
- http://www.mediafire.com/download/nvb7lfuan9t7ar7/VIRTUAL_HANDS.zip
- http://www.mediafire.com/download/70lszwra4lkg3z5/VIRTUAL_DUMMY.zip
The Japanese version can be downloaded here.
A French translation can be found in this forum [link].
In this series of articles I will explain how I created the following animation.

next
Subscribe to:
Posts (Atom)