I am using this version because I prefer the user interface to that of the newer version.
If you are using the newer version you may need to save in Metasequoia Format version 1.0 for compatibility with Mikoto.
<update>
Now I have used Metasequoia 4 I see that there is no option to save as Format 1.0. What you can do is make sure you triangulate any N-Gons which are polygons made from 5 or more points and save the *.mqo.
Then either open the *.mqo in Metasequoia 3 and save or open the Metasequoia 4 *.mqo in a text editor and change the version in the header from 1.1 to 1.0.
If using Metasequoia 4.2 or newer make sure not to save with an embedded thumbnail [link].
An easier way is just to save as version 2.2 *.mqo in Metasequoia 4 since Mikoto can open those files.
</update>
To animate with Mikoto you create a model in Metasequoia in one or more object layers and then create a skeleton in an object layer of its own.
The skeleton (also known as an armature) is made up of bones with each bone sized, positioned and angled to match parts of the model. Each bone can be rotated and some translated to create the animation.
Each part of the model is then assigned to a bone or bones so that when a bone is manipulated, the corresponding part of the model is manipulated as if it was connected to the bone.
Mikoto allows different ways to assign parts of a model to bones.
- Use object names
- Use boxes (known as anchors) around parts of the model
- Use materials
- Use the closest bone
- Use the size of the bone
To create a bone for use in Mikoto, an object named bone: must be created in Metasequoia. Do not forget to type the colon, :, at the end. Mikoto doesn't seem to need this name all lowercase.
All bones must be created while the bone: object is the current object, that is, selected in the object list.
Bones are created by creating a triangle with one angle greater than or equal to 90 degrees and one side longer than the other.
If you study the examples released by users you will see that it is usual to create the triangle with an angle greater than 90 degrees since it is not easy to create an angle of exactly 90 degrees.
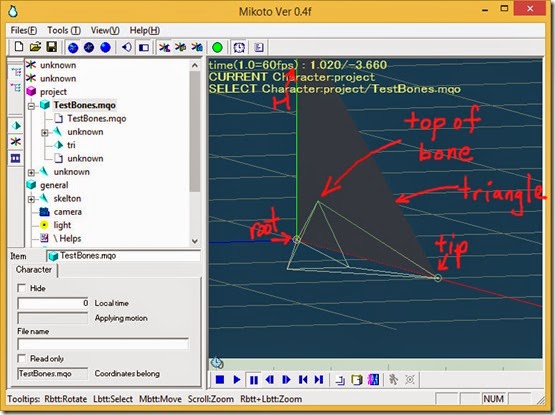
I will label the points root, tip and H as shown in the diagram below.
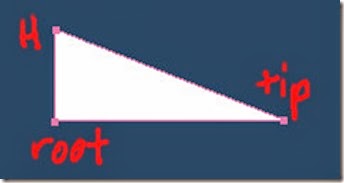
Each triangle must be single sided, that is only have one face so that it is visible from only one side.
The largest angle of the triangle is the root of the bone and the bone will rotate about this point.
The bone will be as long as the long side of the triangle (root to tip).
The bone’s direction will be the same as the direction of the long side of the triangle, that is, from root to tip.
The direction of the short side of the triangle (from root to H) indicates the top of the bone.
The top of the bone is indicated by a green coloured line in Mikoto and the bottom by yellow coloured lines.
The length of the short side of the triangle (root to H) is used to assign vertices of the model to a bone.
Imagine a cylinder with its central axis aligned with the long side of the triangle (root to tip) and its radius equal to the short side length (root to H) and its length equal to to the length of the long side (root to tip). In the absence of any other method to assign parts of the model to a bone, then any parts (vertices) inside this cylinder will be attached to the bone.
Lets create some bones for practise.
Start Metasequoia or click File>New if you already have a model opened in Metasequoia.
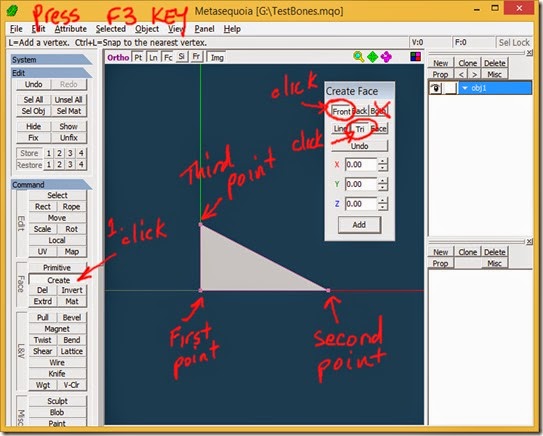
Press the F3 key to get front view and then click Create in the command panel.
Click the “Tri” button in the Create Face dialog and make sure “Front” is clicked. Do not click “Both” since this will create a double sided triangle.
To create a triangle just click three times in the view to create the three points of the triangle. Make the first point the root so you can accurately position the rotation point of the bone.
Save as an *.mqo file and open the saved file in Mikoto using Files>Open or by dragging the *.mqo file onto Mikoto and clicking “Yes” in the untranslated dialog.
Mikoto’s 3D display is similar to Metasequoia. Right clicking and dragging rotates the scene, middle mouse clicking and dragging translates the scene, the mouse wheel zooms, clicking left and right mouse buttons and dragging also zooms and the F1, F2 and F3 keys can be used to display front, top and side views.

In Mikoto the triangle is a triangle and not a bone because our object name is obj1 and not bone:.
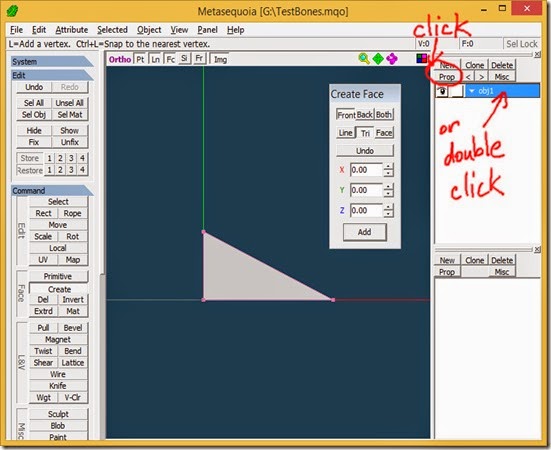
In Metasequoia double click on obj1 in the list of names in the object panel or click on the “Prop” button to bring up the Object Property dialog.
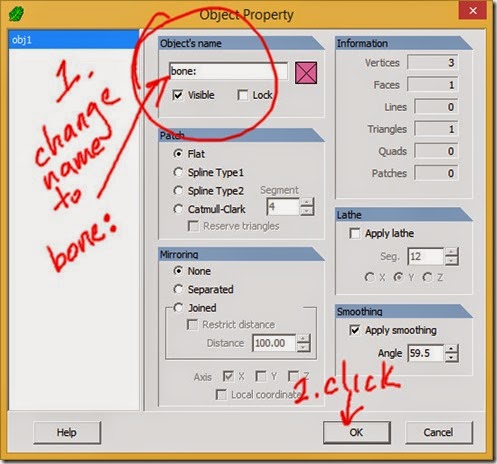
Change the object’s name to bone: and click OK and then save the file.
Open the *.mqo file in Mikoto and click on the *.mqo filename next to the cyan coloured cube in the tree hierarchy and see that we have created a bone.
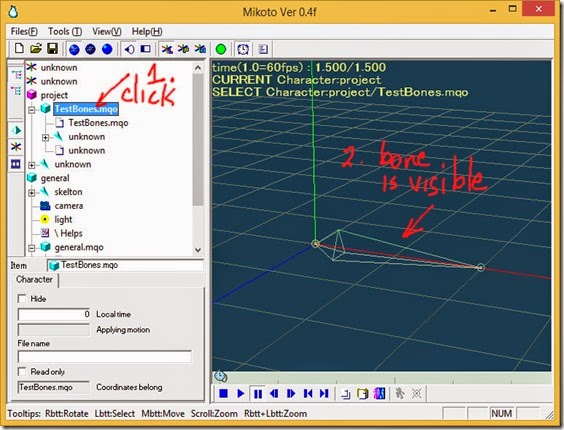
The next screenshots show how the bone relates to the triangle it is based upon.

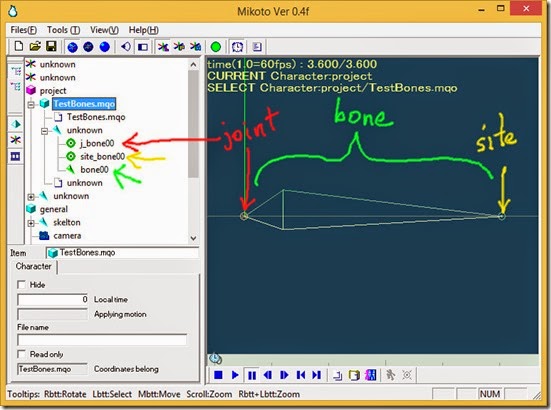
A bone is made up of 3 sections.
The “joint” which is the circle at the root of the bone, the “site” which is the circle at the tip of the bone and the bone itself.
To manipulate the bone you click on it in the 3D view.
IMPORTANT: Click on the site circle before clicking on the bone section and rotate the bone slightly in two directions before clicking on the bone section. I don’t know if it is a bug in the program or something else, but if you click on the bone section first, the bone disappears. If it does disappear, click Files>New and then open the *.mqo file again.
Click OK if asked to create a new motion.
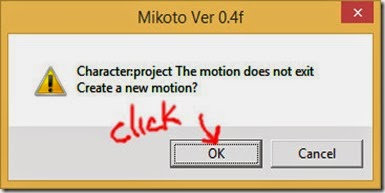
If you click and drag the joint section you can translate the bone.
You can can also translate it in an axis by clicking on the joint section to display the translate manipulator and then clicking on the X, Y or Z and dragging.
Whenever you click on any letter (X, Y, Z, P, B, H) and drag to move or rotate a bone you can hold the SHIFT key to move or rotate in increments.
Translating this bone is only possible because there is not another bone connected to its root.
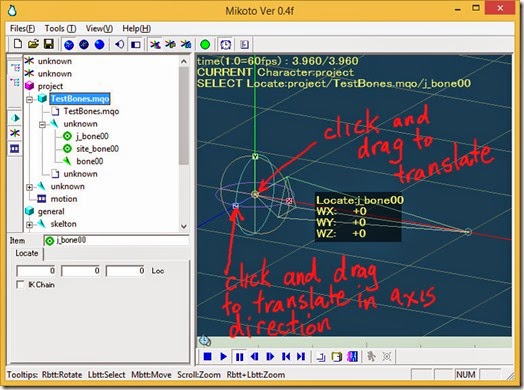
Right clicking on the joint or X, Y or Z will pop up a menu. Clicking “StartPos” will return the bone to its original position.

You can also right click on the object "unknown" indicated by the cyan triangle in the tree hierarchy under the *.mqo object to pop up a menu and click "EarlyPos" to restore the bone to its original position.
You can click and drag the site section to position the tip and so rotate the bone into any orientation.
You can also click on X, Y or Z and drag to move the tip in the direction of that axis. The bone cannot be made longer or shorter so clicking Z and dragging will have no effect.
Right clicking on the site or X, Y or Z will pop up the same menu as for the joint but clicking “StartPos” has no effect this time.

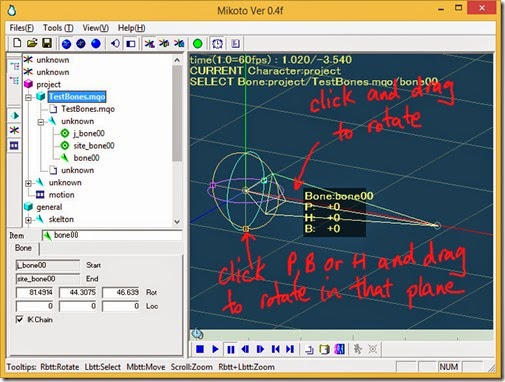
Clicking on the bone section allows you to rotate the bone.
Clicking and dragging the bone will rotate it.
When you click on a bone section to display the rotation manipulator you can use the mouse wheel or Page Up and Page Down to spin/twist the bone about its central axis.
You can also rotate the bone by clicking on P, B or H and dragging. The bone will rotate in the plane indicated by the circle attached to P, B or H. The circle is the same colour as the letter.
P, B and H stand for pitch, bank and heading respectively. These terms for rotation in 3D space were created to describe the rotations of aeroplanes.
In Mikoto, pitch is rotation about the X axis, bank is rotation about the Z axis and heading is rotation about the Y axis.
Right clicking on P, B or H will pop up a menu and clicking “EarlyPos” will return the bone to its original orientation.
To create a hierarchy of bones you must connect triangles in the bone: object in Metasequoia.
The triangles can be connected by joining the tip of one triangle to the root of another triangle or by joining the tip of one triangle to the root of another triangle by a line.

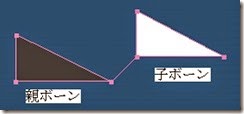
To directly connect one triangle to another, when creating the first point of the second triangle, hold CTRL and click on the tip of the first triangle.
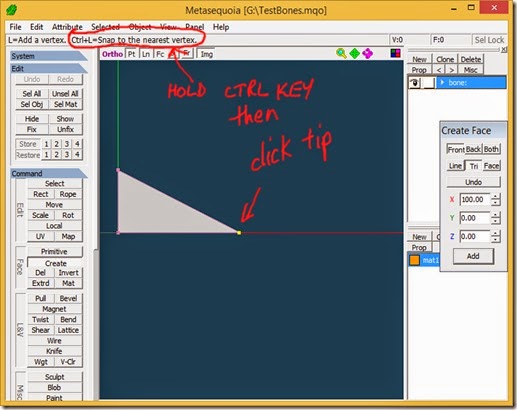
To connect two triangles by a line click on the “Line” button in the Create face dialog.
Hold CTRL and click on the tip of one triangle and hold CTRL and click on the root of the other triangle.
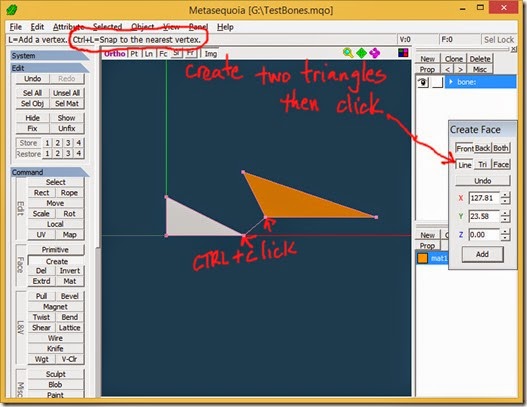
If you are not successful and there are in fact two separate vertices (points) at the tip-root connection or tip-line connection or line-root connection, rectangle select the vertices and then press CTRL+J or click Selected>Join Vertices in the menu to join them.
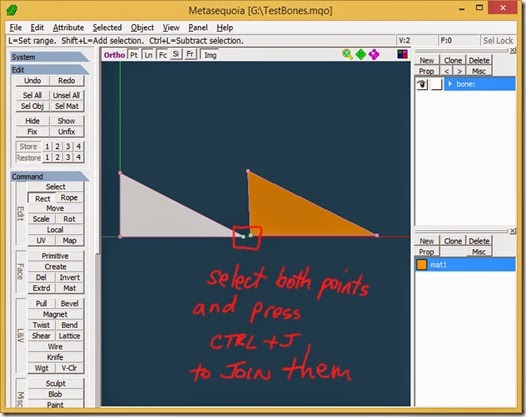
In these two connections the white coloured triangle is known as the parent and the orange coloured triangle is known as the child.
Below is a screenshot of Mikoto showing the bones created by connecting triangles to each other.
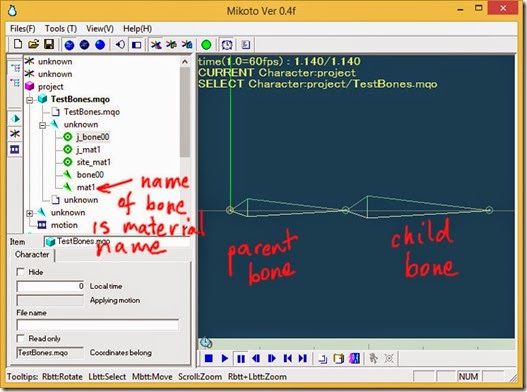
Click the parent bone and rotate it and see that that the child bone is rotated also.
Click the parent bone’s joint and translate the parent bone and see that both bones are translated.
Click the parent bone’s site and move it and see that the child bone moves with it.
Click the child bone and rotate it and see that the parent bone does not rotate.
See that the joint of the child bone is actually the site of the parent bone and the child bone cannot be translated from the parent bone.
Click the child bone’s site and see that the parent bone moves. This is inverse kinematics (IK).
Also see because we created the second triangle with a material in Metasequoia, the name of the child bone in Mikoto is the material name.
Below is a screenshot of Mikoto showing the bones created from connecting triangles with a line.

The difference with this style of connection is that moving the tip of the child bone does not move the parent bone, that is, there is no inverse kinematics from child to parent. The joint of the child bone is red and has an “X” in the circle to indicate the end of an IK chain consisting of only the child bone in this case..
Download some examples from the internet or use the samples in the Mikoto folder and study them in Mikoto and Metasequoia to see how bones work.
prev | next
No comments:
Post a Comment